As we wrapped up the first year of homeschooling, I found myself increasingly concerned about the possibility of summer learning ... read more
March 19, 2026


I’ve been extremely fortunate these past couple years in that work and life have taken me on some travel adventures. As much as I love being home, traveling has become one of my hobbies. Travel brings me so much joy and countless memories.

One of my favorite recent trips was the Carnival cruise I took with my mom. Not only was it wonderful to spend a week on the sea with her, but she really deserved it. In addition to her job, she takes care of my elderly grandparents who now require 24-hour care. Giving her a week of Caribbean sunshine, delicious food, total relaxation, and endless entertainment was something I was so honored to be able to do. Cruising is such an easy way to do that and more. Everything you want in a vacation is at your fingertips.
As you know, I took lots of photos on our cruise. Because everything is digital these days, I find that many of my travel pictures get uploaded to my computer and then are long forgotten. I wanted a fun way to remember the time on that grand ship, so I came up with two alternatives for creating a DIY Travel Photo Collage that I’d like to share with you today.
Let’s get started!
This first collage is made in a shadow box frame. Along with some mini clothespins and a touch of gold (of course!), it’s a quick and colorful way to show a series of photos, and it can be easily changed or updated.

Here’s what you will need:
Begin by gathering your supplies. Most of these items can be found at your local craft store or online.

Cut a piece of paper to fit the size of your frame. Any color or patterned paper will work. I’m using this gold wood grain paper, which is actually leftover wrapping paper from the holidays. With a pencil, just trace the backing of the frame onto the paper and then cut it out.

If your paper is flimsy like mine, you’ll want to use some double sided tape to adhere it to the backing of your frame, the piece of paper typically included in the frame, or a thicker piece of card stock.

Then, tuck your photos into your mini clothes pins and arrange them on the paper to get an idea of the layout you’d like. Since my paper was highly patterned, I used a theme of blue and green for both my pictures and my clothespins.

Next, measure exactly where the clothespins will attach to the paper. Since my frame was 12 x 12″, I started in the center with my first clothespin and set one on each side three inches away. I repeated the same measurements with the second row.

To attach the clothespins, I applied a very small amount of hot glue to each clothespin and then placed it where I wanted it on the paper. (E6000 would work here as well; just be sure to give it time to dry.)
Once all the clothespins are in place, tuck in your pictures and assemble the frame.

Tada!
I thought this particular collage turned out great. All of these photos trigger such great memories of the time I got to spend with my mom. There were beautiful sunsets and sunrises we could watch off the balcony of our stateroom, we were able to enjoy fun and relaxing days when we ported, and the gorgeous palm trees always remind me the ocean is nearby.
As you can imagine, just by varying the paper, clothespins, and photos, you can create something that is truly customized to your space.

This collage also perfectly captures the memories of our cruise. While I took a few photos of this collage on my mantel, it will ultimately reside on my hallway gallery wall where I can see it every day.
Okay, ready for collage number two?
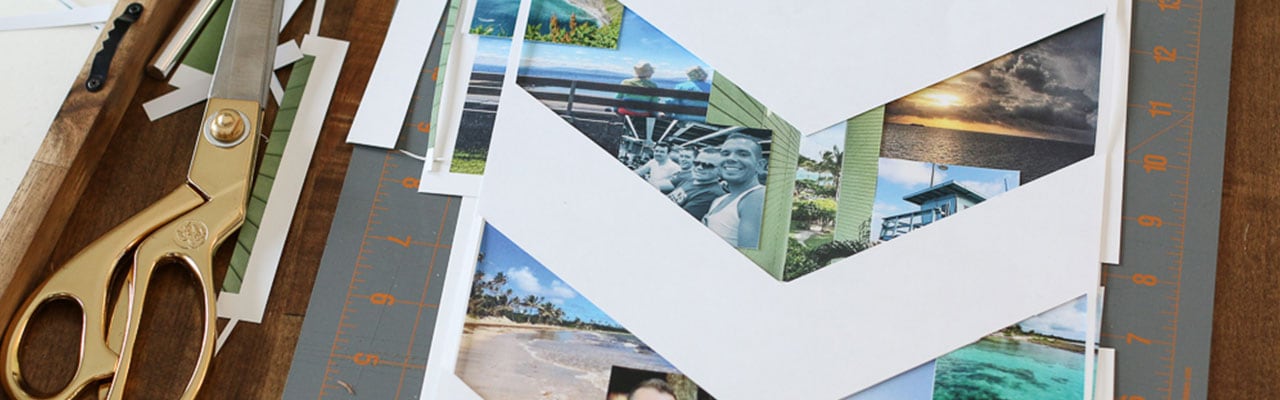
This one is a bit more of a traditional collage-style, but with a modern twist. A cut out chevron / arrow pattern reveals a collection of pictures in the negative space. The finished piece has a more modern feel, but is still bursting with memories. Let me show you how to make it.

Here’s what you will need:
If you want to make this exact collage, I’ve provided a free PDF printable here. However, you’re welcome to create your own in any shape or pattern you like. Begin by printing off your pattern on a piece of card stock.

Carefully cut out the design using an X-Acto knife. Do this on a self-healing mat, scrap piece of wood, or another surface you don’t mind damaging.

Then, on a second piece of card stock, start arranging your photos in the areas that will show through in your design. I used a couple different sized photos. I also removed any white borders around my photos so they would blend almost seamlessly together.

Once you are happy with the placement of your photos, attached them to the sheet of uncut card stock with double sided tape or rubber cement. (Rubber cement is better than standard white glue because it won’t cause your photos to curl or bubble.) With all of the photos secured, attached the cut out card stock to the top with double sided tape or cement.
Place the finished piece in your frame, and your project is complete.

This piece lets you display multiple photos in a really fun pattern. From a distance, it looks like a piece of modern art, but upon closer inspection, it’s a travel keepsake and memory inducer. The best of both worlds. Now, all I have to do is open my eyes and I’m transported back to the Carnival cruise with my mom.

I hope you enjoyed both of these tutorials. If you’re anything like me, now is the time to get those travel pictures off your computers and onto your walls. No more excuses. I can’t wait to see what you create.
![]()
By Inspired by Charm
Michael Wurm, Jr. is the interior designer, cook and crafter behind the popular lifestyle blog Inspired by Charm, where you will find imaginative recipes, DIY projects, home décor inspiration and hosting tips and more.
As we wrapped up the first year of homeschooling, I found myself increasingly concerned about the possibility of summer learning ... read more
If there’s one thing we love doing here at Carnival Cruise Line, it’s dreaming up new ways for the world’s ... read more
Best Places to Visit in Alaska While Cruising Juneau Ketchikan Skagway Sitka Icy Strait Point Victoria Although the snowy peaks ... read more
Whether you’re looking for a chill family getaway or a relaxing couples vacation, we’ve got the spots to kick back! ... read more
Ready for an adventure that will literally light up your life? The Northern Lights are a cosmically show-stopping natural wonder ... read more
These natural preserves are a must-see! There is plenty to see when you travel to the Caribbean. Although beaches may ... read more
Canopy Adventure & Wildlife Expedition Bering Sea Crab Fisherman’s Tour Adventure Kart Expedition Tracy Arm Fjord & Glacier Explorer Exclusive ... read more
Top 8 Things to Do in Sitka Jet-Cat Wildlife Quest & Beach Exploration Sea Otter & Wildlife Quest Wilderness Sea ... read more
The 49th State is a wild, untamed natural wonderland just waiting to blow your mind. We’re talkin’ breathtaking ancient glaciers. ... read more
Want to set off on an extended trip you’ll never forget? Head out on a Carnival Journeys getaway! This longer, ... read more
Finding the person you want to spend the rest of your life with is truly one of the most beautiful ... read more