Are you taking a cruise for the first time? We’ve got you covered. We’ve gathered the 10 most important first-time cruise ... read more
June 23, 2026


Whether you’re hosting a large dinner party or just entertaining a friend for coffee on the porch, it’s always nice to have a helping hand. A serving tray can make moving food and drinks to and from the kitchen so much easier. Even though you can certainly pick up a plain ol’ serving tray at the store, who wants that? Today I’m going to teach you how to make your own colorful DIY Serving Tray.


For the past couple years, I’ve partnered with Carnival Cruise Line to bring you everything from cruising tips to recipes to unique party ideas. This DIY Serving Tray is also inspired by my cruises with Carnival. One of my favorite afternoon activities (I’m using the word “activities” loosely.) is lounging on the lido deck and catching some rays while people watching. Just being out there is a little slice of heaven. What makes it even better is that the wonderful staff come around often to take drink orders and serve beverages. Yes, my friends – cocktails are delivered right to you – on a tray. Pure bliss.
Side note: Speaking of Carnival’s cocktails, you should definitely check out some of their recipes I’ve recreated at home: Tiramisu Martini, Spicy Chipotle Pineapple Martini, and Carnival Cocktail.
Maybe it’s just me, but serving something on a tray, regardless of what it is, makes it special. Somehow it seems fancier and more luxurious. Not to mention that the tray allows you carry twelve drinks instead of two.
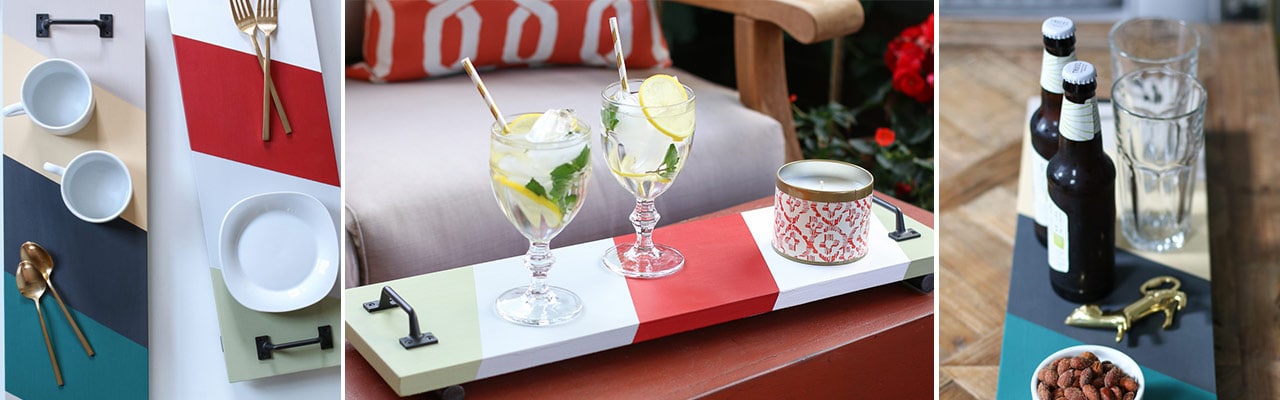
Thinking about my own experiences, I got to work. With some nautical color inspiration, I gathered paint together and made a quick trip to the hardware store for supplies. After an afternoon of painting and a little assembly, I had two new trays ready for entertaining. Here’s what I came up with.

A fun and modern take on sailing, right?
I opted for a simple tray that’s easy to put together. But then went bold with graphic design. Ship sails inspired the color and pattern.

To give the tray an unexpected touch, I used dowel rods to create feet.

I love these new trays. Now, I just need to find someone who will deliver a cocktail to me. Ha!
Let me show you how I made them.

To make one tray, you will need:

To begin, paint your wood board. I used a simple diagonal pattern that I marked off with painters tape. If you’re using four colors like I did, you can paint with two of the colors first. Allow them to dry, tape again, and the finish off with your second two colors.

I painted the top and sides this way. For the bottom, I just used an off-white.

While the paint is drying, cut your dowel rods to the width of your board (8-inches). Then paint them. I used black to match my handles.

Once everything is dry, you’re ready to assemble.

Use a ruler to determine the location of your handles. Place the handles on the top of the tray and mark through the screw hole with a pencil.

Predrill the screw holes where you made the marks. If you’re using a handle that has four holes (like mine), drill all of the way through the board for the two holes that face the center of the board and only about halfway though for the holes at the edge of the board.

Once your holes are drilled, flip the board over. Using a ruler to keep a straight line, add a thin bead of super glue across the width of the board where you’ve predrilled the holes.


Then, place your painted dowel on the super glue. Repeat on the other side. Allow both to dry.

Now, flip the board back over. Redrill the inner holes (They now have the dowels underneath them.) going about halfway through the dowels.

Finally, attach your handles. The screws that come with the handles will go into the outer holes and the longer screws will go into the inner holes. Along with the super glue you used, they will keep your dowels in place.

And with that, your DIY Serving Tray is complete!
That wasn’t too complicated, was it?

Naturally, you can use any color combination or pattern that you like. Also feel free to switch up the hardware to make it your own.


As you can see, these trays are handy for serving coffee, beer, lemonade, or whatever you fancy.
The only thing I couldn’t figure out was how to have the tray serve you without you having to do any of the work. I’ll keep working on that.

In the meantime, I guess you’ll have to hop on a Carnival Cruise ship if you want that kind of service. Head on over to their website for details on all of their on-board services.
I hope you enjoyed this fun and colorful tutorial. Until next time.
This post was created for Away We Go with Carnival, the destination for getting in the getaway state of mind.
![]()
By Inspired by Charm
Michael Wurm, Jr. is the interior designer, cook and crafter behind the popular lifestyle blog Inspired by Charm, where you will find imaginative recipes, DIY projects, home décor inspiration and hosting tips and more.
Are you taking a cruise for the first time? We’ve got you covered. We’ve gathered the 10 most important first-time cruise ... read more
As we wrapped up the first year of homeschooling, I found myself increasingly concerned about the possibility of summer learning ... read more
If there’s one thing we love doing here at Carnival Cruise Line, it’s dreaming up new ways for the world’s ... read more
Best Places to Visit in Alaska While Cruising Juneau Ketchikan Skagway Sitka Icy Strait Point Victoria Although the snowy peaks ... read more
Whether you’re looking for a chill family getaway or a relaxing couples vacation, we’ve got the spots to kick back! ... read more
Ready for an adventure that will literally light up your life? The Northern Lights are a cosmically show-stopping natural wonder ... read more
These natural preserves are a must-see! There is plenty to see when you travel to the Caribbean. Although beaches may ... read more
Canopy Adventure & Wildlife Expedition Bering Sea Crab Fisherman’s Tour Adventure Kart Expedition Tracy Arm Fjord & Glacier Explorer Exclusive ... read more
Top 8 Things to Do in Sitka Jet-Cat Wildlife Quest & Beach Exploration Sea Otter & Wildlife Quest Wilderness Sea ... read more
The 49th State is a wild, untamed natural wonderland just waiting to blow your mind. We’re talkin’ breathtaking ancient glaciers. ... read more
Want to set off on an extended trip you’ll never forget? Head out on a Carnival Journeys getaway! This longer, ... read more